Terminal > Terminal appearance
Terminal prompt
# Terminal prompt import DemoVideo from '@components/DemoVideo.astro'; import VideoEmbed from '@components/VideoEmbed.astro'; Warp supports two prompt types: the **Warp prompt** and the **Shell prompt (PS1)**. ## Choosing your prompt type To switch your prompt type: 1. Open **Settings** > **Appearance**. 2. Under **Input**, set **Input type** to **Warp** or **Shell (PS1)**. When using the Warp prompt, you can right-click the prompt area to copy the entire prompt, working directory, current git branch, git uncommitted file count, and more. When using a Shell prompt, you can right-click the prompt area to copy the entire prompt, or select any part of the prompt in previously run blocks in your session. ## Warp prompt Warp has a native prompt that displays context chips showing information such as your current working directory, git branch, svn status, Kubernetes context, pyenv, date, and time. The Warp prompt is the default when **Input type** is set to **Warp**. To customize which context chips your Warp prompt displays: 1. Right-click the prompt area and select **Edit prompt**. <figure>  <figcaption>Prompt editing via right-click.</figcaption> </figure> 2. Select **Warp Prompt**. 3. Drag and drop context chips to configure which pieces of information your prompt displays. {/* TODO: Add an updated screenshot of the Edit prompt chip customization view (drag-and-drop interface) here, and delete the outdated edit-prompt-modal (1).png from assets. */} ### Git and Subversion Git and Subversion context chips show which branch you are on locally, as well as the number of uncommitted changed files. This includes any new files, modified files, and deleted files that are staged or unstaged. ### Kubernetes The Kubernetes context chip shows relevant information when you're using one of the following commands: `kubectl|helm|kubens|kubectx|oc|istioctl|kogito|k9s|helmfile|flux|fluxctl|stern|kubeseal|skaffold|kubent|kubecolor|cmctl|sparkctl|etcd|fubectl` :::note Warp respects the `KUBECONFIG` environment variable. Make sure you set it to your preferred configuration file location if it's not the default path of `~/.kube/config`. ::: {/* TODO: Same-line prompt was removed in the current release. May return in a future version (V2/V3). Uncomment when the feature ships. */} {/* ### Same line prompt By default, Warp's prompt displays on two lines where the command-line input is one line below the prompt. To enable same-line prompt: 1. Right-click the prompt area and select **Edit prompt**. 2. Select **Warp Prompt**. 3. Check the box for **Same line prompt**. */} ## Shell prompt (PS1) You can use a Shell prompt instead of the Warp prompt by configuring the **PS1** variable or installing a supported shell prompt plugin (see [Shell prompt compatibility table](/terminal/appearance/prompt/#shell-prompt-compatibility-table)). To enable the Shell prompt: 1. Open **Settings** > **Appearance**. 2. Under **Input**, set **Input type** to **Shell (PS1)**. 3. Configure your PS1 variable in your shell's RC file, or install a supported prompt plugin. :::note The PS1 is a variable used by the shell to generate the prompt, it represents the primary prompt string (hence the "PS") - which the terminal typically displays before typing new commands. ::: ### Multi-line and right-sided prompts The Shell prompt supports multi-line or right-sided prompts in zsh and fish, not bash. However, you can't have a multiline right-side prompt, only a multiline left prompt. :::note If you want to add a new line to your Shell prompt, run the following based on your shell or prompt: ```sh # Bash echo -e '\nPS1="${PS1}"$'\''\\n'\''' >> ~/.bashrc # Zsh echo -e '\nPROMPT="${PROMPT}"$'\''\\n'\''' >> ~/.zshrc # Fish echo -e '\nfunctions --copy fish_prompt fish_prompt_orig; function fish_prompt; fish_prompt_orig; echo; end' >> ~/.config/fish/config.fish # Powershell $rawString = @' $originalPrompt = Get-Item Function:\prompt Set-Item -Path Function:\prompt_original -Value $originalPrompt function prompt { "$(& prompt_original)`n" } '@ Add-Content -Path $PROFILE -Value "`n$rawString`n" # Powerlevel10k p10k configure # Starship Prompt echo '[line_break]\ndisabled = false' >> ~/.config/starship.toml ``` ::: ## How it works <DemoVideo src="/assets/terminal/warp-custom-prompt-demo.mp4" label="Warp Prompt + Custom Prompt Demo" /> {/* Outdated screenshot removed; see TODO after step 3 in the Warp prompt section. */} ### Shell prompt compatibility table | Shell | Tool | Does it work? | | --------------------------- | ------------------------------------------------------------------------- | --------------------------------------------------------------- | | bash \| zsh | [PS1](https://www.warp.dev/blog/whats-so-special-about-ps1) | Working | | bash \| zsh \| fish \| pwsh | [Starship](https://github.com/starship/starship) | [Working\*](/terminal/appearance/prompt/#starship) | | bash \| zsh \| fish \| pwsh | [oh-my-posh](https://github.com/JanDeDobbeleer/oh-my-posh) | Working | | zsh | [Powerlevel10k](https://github.com/romkatv/powerlevel10k) | [Working\*](/terminal/appearance/prompt/#powerlevel10k) | | zsh | [Spaceship](https://github.com/spaceship-prompt/spaceship-prompt) | [Working\*](/terminal/appearance/prompt/#spaceship) | | zsh | [oh-my-zsh](https://github.com/ohmyzsh/ohmyzsh) | Working | | zsh | [prezto](https://github.com/sorin-ionescu/prezto) | [Working\*](/terminal/appearance/prompt/#prezto) | | ssh | | Working | | bash | [oh-my-bash](https://github.com/ohmybash/oh-my-bash) | Not supported | | bash | [bash-it](https://github.com/Bash-it/bash-it) | Not supported | | bash | [SBP](https://github.com/brujoand/sbp) | Not supported | | bash | [synth-shell-prompt](https://github.com/andresgongora/synth-shell-prompt) | Not supported | | bash \| zsh | [Powerline-shell](https://github.com/b-ryan/powerline-shell) | Not supported | | zsh | [zplug](https://github.com/zplug/zplug) | Not supported | | fish | [tide](https://github.com/IlanCosman/tide) | [Not supported](https://github.com/warpdotdev/Warp/issues/3358) | | fish | [oh-my-fish](https://github.com/oh-my-fish/oh-my-fish) | [Not supported](https://github.com/warpdotdev/Warp/issues/3796) | ## Known incompatibilities If you're having issues with prompts, please see below or our [Known Issues](/support-and-community/troubleshooting-and-support/known-issues/#configuring-and-debugging-your-rc-files) for more troubleshooting steps. ### Starship #### Starship settings Some `~/.config/starship.toml` settings are known to cause errors in Warp. `#` or `DEL` the following lines to resolve known errors: ``` # Get editor completions based on the config schema '' = 'https://starship.rs/config-schema.json' # Disables the custom module [custom] disabled = false ``` For `fish` shell, optional for `bash|zsh`, disable the multi-line prompt in Starship by putting the following in your `~/.config/starship.toml`: ``` [line_break] disabled = true ``` You may also see an error relating to timeout. You can set the `command_timeout` variable in your `~/.config/starship.toml` to fix this. See more in the [starship docs](https://starship.rs/config/#prompt). #### Starship + bash Starship prompt may not render properly if your [default shell](/getting-started/supported-shells/#changing-what-shell-warp-uses) is `/bin/bash`. To [workaround](https://github.com/warpdotdev/Warp/issues/3066#issuecomment-1548643121) the issue, we recommend you upgrade bash, find the path with `echo $(which bash)`, then put the path in **Settings** > **Features** > **Session** > **"Startup shell for new sessions"**. #### Starship + zsh If you want to restore the additional line after the Starship prompt on `zsh`, add the following to the bottom of your `~/.zshrc` file: `PROMPT="${PROMPT}"$'\n'` ### Powerlevel10k When installing the Powerlevel10k (P10k) prompt, we recommend you use the [Meslo Nerd Font](https://github.com/romkatv/powerlevel10k/blob/master/font.md).\ \ P10K may display the arrow dividers as grey instead of color. The color for those chars is rendered grey due to Warp's minimum contrast setting. To [workaround](https://github.com/warpdotdev/Warp/issues/2851#issuecomment-1605005256) this issue, go to **Settings** > **Appearance** > **Text** > **Enforce minimum contrast** and set it to "Never". <figure>  <figcaption>Example of the grey dividers in p10k.</figcaption> </figure> Warp does support [p10k](https://github.com/romkatv/powerlevel10k#installation) version 1.19.0 and above. Ensure you have the latest version installed and restart Warp after the installation/update of p10k. Then enable the custom prompt as stated [above](/terminal/appearance/prompt/#choosing-your-prompt-type) and it should work. :::note Warp still doesn't fully support some p10k features like transient prompt and visual features like gradients. ::: <VideoEmbed url="https://www.youtube.com/watch?t=18s&v=dIV9Cso4Mi8" title="Installing Powerlevel10k" /> :::caution Please note the Installing Powerlevel10k video mentions enabling a custom prompt in **Settings** > **Features** > **Honor users custom prompt (PS1)**, but it's now in **Settings** > **Appearance** > **Input** > **Classic** > **Current prompt** > **Shell Prompt (PS1)**. ::: ### Spaceship This prompt can cause an issue with typeahead in Warp's input editor. To [workaround](https://github.com/warpdotdev/Warp/issues/1973#issuecomment-1340150521) the issue, run `echo "SPACESHIP_PROMPT_ASYNC=FALSE" >>! ~/.zshrc`. ### Prezto Although Warp does have support for prezto's prompt, enabling the [prezto utility module](https://github.com/sorin-ionescu/prezto/blob/master/modules/utility/README.md) in the `.zpreztorc` is not supported as with many other autocompletion [plugins that are incompatible](/support-and-community/troubleshooting-and-support/known-issues/#list-of-incompatible-tools). ### Disabling unsupported prompts for Warp We advise using Warp's default prompt or installing one of the supported tools, see [Compatibility Table](/terminal/appearance/prompt/#shell-prompt-compatibility-table). You can disable unsupported prompts for Warp as such: ``` if [[ $TERM_PROGRAM != "WarpTerminal" ]]; then ##### WHAT YOU WANT TO DISABLE FOR WARP - BELOW # Unsupported Custom Prompt Code ##### WHAT YOU WANT TO DISABLE FOR WARP - ABOVE fi ``` #### iTerm2 The iTerm2 shell integration breaks Warp and your custom prompt will not be able to be visible with this on. If you're coming from iTerm2 please check your dotfiles for it. We advise disabling the integration for Warp like so: ``` if [[ $TERM_PROGRAM != "WarpTerminal" ]]; then ##### WHAT YOU WANT TO DISABLE FOR WARP - BELOW test -e "${HOME}/.iterm2_shell_integration.zsh" && source "${HOME}/.iterm2_shell_integration.zsh" ##### WHAT YOU WANT TO DISABLE FOR WARP - ABOVE fi ```Tell me about this feature: https://docs.warp.dev/terminal/appearance/prompt/Configure Warp's native prompt with context chips or use your own Shell prompt (PS1).
Warp supports two prompt types: the Warp prompt and the Shell prompt (PS1).
Choosing your prompt type
Section titled “Choosing your prompt type”To switch your prompt type:
- Open Settings > Appearance.
- Under Input, set Input type to Warp or Shell (PS1).
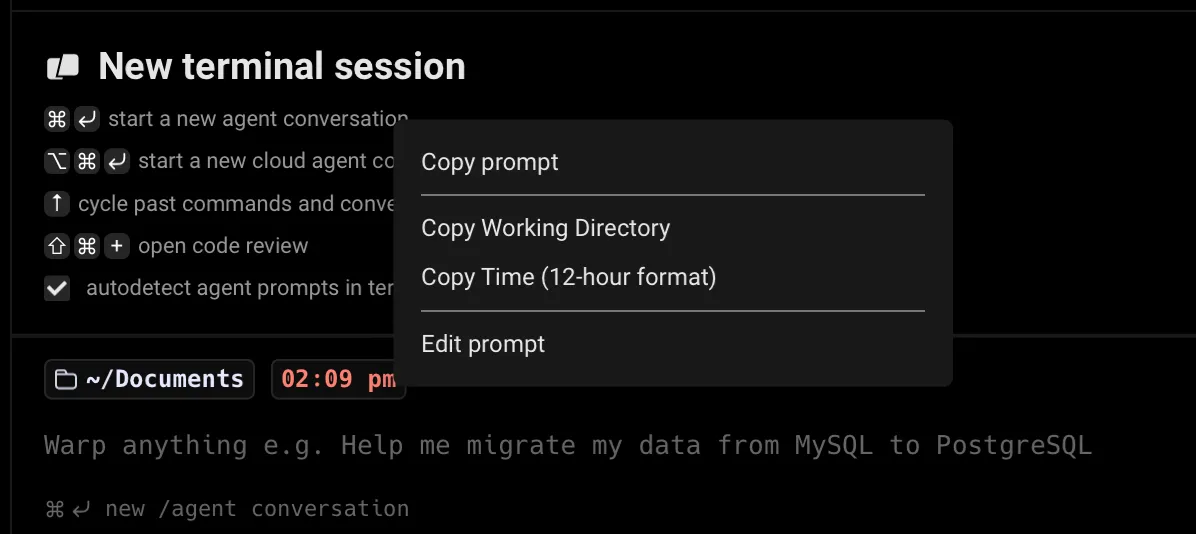
When using the Warp prompt, you can right-click the prompt area to copy the entire prompt, working directory, current git branch, git uncommitted file count, and more.
When using a Shell prompt, you can right-click the prompt area to copy the entire prompt, or select any part of the prompt in previously run blocks in your session.
Warp prompt
Section titled “Warp prompt”Warp has a native prompt that displays context chips showing information such as your current working directory, git branch, svn status, Kubernetes context, pyenv, date, and time. The Warp prompt is the default when Input type is set to Warp.
To customize which context chips your Warp prompt displays:
- Right-click the prompt area and select Edit prompt.
- Select Warp Prompt.
- Drag and drop context chips to configure which pieces of information your prompt displays.
Git and Subversion
Section titled “Git and Subversion”Git and Subversion context chips show which branch you are on locally, as well as the number of uncommitted changed files. This includes any new files, modified files, and deleted files that are staged or unstaged.
Kubernetes
Section titled “Kubernetes”The Kubernetes context chip shows relevant information when you’re using one of the following commands:
kubectl|helm|kubens|kubectx|oc|istioctl|kogito|k9s|helmfile|flux|fluxctl|stern|kubeseal|skaffold|kubent|kubecolor|cmctl|sparkctl|etcd|fubectl
Shell prompt (PS1)
Section titled “Shell prompt (PS1)”You can use a Shell prompt instead of the Warp prompt by configuring the PS1 variable or installing a supported shell prompt plugin (see Shell prompt compatibility table).
To enable the Shell prompt:
- Open Settings > Appearance.
- Under Input, set Input type to Shell (PS1).
- Configure your PS1 variable in your shell’s RC file, or install a supported prompt plugin.
Multi-line and right-sided prompts
Section titled “Multi-line and right-sided prompts”The Shell prompt supports multi-line or right-sided prompts in zsh and fish, not bash. However, you can’t have a multiline right-side prompt, only a multiline left prompt.
How it works
Section titled “How it works”Shell prompt compatibility table
Section titled “Shell prompt compatibility table”| Shell | Tool | Does it work? |
|---|---|---|
| bash | zsh | PS1 | Working |
| bash | zsh | fish | pwsh | Starship | Working* |
| bash | zsh | fish | pwsh | oh-my-posh | Working |
| zsh | Powerlevel10k | Working* |
| zsh | Spaceship | Working* |
| zsh | oh-my-zsh | Working |
| zsh | prezto | Working* |
| ssh | Working | |
| bash | oh-my-bash | Not supported |
| bash | bash-it | Not supported |
| bash | SBP | Not supported |
| bash | synth-shell-prompt | Not supported |
| bash | zsh | Powerline-shell | Not supported |
| zsh | zplug | Not supported |
| fish | tide | Not supported |
| fish | oh-my-fish | Not supported |
Known incompatibilities
Section titled “Known incompatibilities”If you’re having issues with prompts, please see below or our Known Issues for more troubleshooting steps.
Starship
Section titled “Starship”Starship settings
Section titled “Starship settings”Some ~/.config/starship.toml settings are known to cause errors in Warp. # or DEL the following lines to resolve known errors:
# Get editor completions based on the config schema'' = 'https://starship.rs/config-schema.json'
# Disables the custom module[custom]disabled = false
For fish shell, optional for bash|zsh, disable the multi-line prompt in Starship by putting the following in your ~/.config/starship.toml:
[line_break]disabled = trueYou may also see an error relating to timeout. You can set the command_timeout variable in your ~/.config/starship.toml to fix this. See more in the starship docs.
Starship + bash
Section titled “Starship + bash”Starship prompt may not render properly if your default shell is /bin/bash. To workaround the issue, we recommend you upgrade bash, find the path with echo $(which bash), then put the path in Settings > Features > Session > “Startup shell for new sessions”.
Starship + zsh
Section titled “Starship + zsh”If you want to restore the additional line after the Starship prompt on zsh, add the following to the bottom of your ~/.zshrc file: PROMPT="${PROMPT}"$'\n'
Powerlevel10k
Section titled “Powerlevel10k”When installing the Powerlevel10k (P10k) prompt, we recommend you use the Meslo Nerd Font.
P10K may display the arrow dividers as grey instead of color. The color for those chars is rendered grey due to Warp’s minimum contrast setting. To workaround this issue, go to Settings > Appearance > Text > Enforce minimum contrast and set it to “Never”.
![]()
Warp does support p10k version 1.19.0 and above. Ensure you have the latest version installed and restart Warp after the installation/update of p10k. Then enable the custom prompt as stated above and it should work.
Spaceship
Section titled “Spaceship”This prompt can cause an issue with typeahead in Warp’s input editor. To workaround the issue, run echo "SPACESHIP_PROMPT_ASYNC=FALSE" >>! ~/.zshrc.
Prezto
Section titled “Prezto”Although Warp does have support for prezto’s prompt, enabling the prezto utility module in the .zpreztorc is not supported as with many other autocompletion plugins that are incompatible.
Disabling unsupported prompts for Warp
Section titled “Disabling unsupported prompts for Warp”We advise using Warp’s default prompt or installing one of the supported tools, see Compatibility Table. You can disable unsupported prompts for Warp as such:
if [[ $TERM_PROGRAM != "WarpTerminal" ]]; then##### WHAT YOU WANT TO DISABLE FOR WARP - BELOW
    # Unsupported Custom Prompt Code
##### WHAT YOU WANT TO DISABLE FOR WARP - ABOVEfi
iTerm2
Section titled “iTerm2”The iTerm2 shell integration breaks Warp and your custom prompt will not be able to be visible with this on. If you’re coming from iTerm2 please check your dotfiles for it. We advise disabling the integration for Warp like so:
if [[ $TERM_PROGRAM != "WarpTerminal" ]]; then##### WHAT YOU WANT TO DISABLE FOR WARP - BELOW
test -e "${HOME}/.iterm2_shell_integration.zsh" && source "${HOME}/.iterm2_shell_integration.zsh"
##### WHAT YOU WANT TO DISABLE FOR WARP - ABOVEfi