Support & Community > Troubleshooting and support
Sending feedback and logs
# Sending feedback and logs import { Tabs, TabItem } from '@astrojs/starlight/components'; ## Sending Warp feedback * Use the [`/feedback`](#using-feedback-in-warp) slash command inside Warp to open the static feedback experience. * Open a new bug or feature request in our [GitHub repository](https://github.com/warpdotdev/warp/issues/new/choose). * Join our [Warp Community Slack](https://go.warp.dev/join-preview) and share feedback in **#feedback-general**, or **#feedback-preview** if it is specific to [Warp Preview](/support-and-community/community/warp-preview-and-alpha-program/). * For security issues or questions, email [security@warp.dev](mailto:security@warp.dev). * For questions about privacy, email [privacy@warp.dev](mailto:privacy@warp.dev). ### Subscribers and Enterprise * For subscriber technical issues or questions (bugs, credits, etc.), email [support@warp.dev](mailto:support@warp.dev). * For subscriber billing issues or questions (refunds, cancellation, etc.), email [billing@warp.dev](mailto:billing@warp.dev). * For enterprise, please direct all feedback and issues to your designated Slack channel. ## Using `/feedback` in Warp The `/feedback` [slash command](/agent-platform/capabilities/slash-commands/) is the fastest way to report a Warp bug, flag a regression, or file a feature request from inside the terminal. It opens the feedback form without starting an Agent conversation or consuming credits. ### What to include Whether you use the `/feedback` slash command or file an issue manually, a good feedback report answers these questions up front: * **What happened?** Describe the observed behavior in one or two sentences. * **What did you expect?** Describe the behavior you expected instead. * **How do we reproduce it?** List numbered steps when possible. If you can't reproduce the issue reliably, mention that too. * **What version of Warp are you on?** `/feedback` fills this in automatically; for manual reports, copy it from **Settings** > **Account**. * **Logs, screenshots, or conversation IDs.** See [Gathering Warp logs](#gathering-warp-logs), [Collecting crash reports on macOS](#collecting-crash-reports-on-macos), or [Gathering AI conversation ID](#gathering-ai-conversation-id) below. See the [Slash Commands reference](/agent-platform/capabilities/slash-commands/) for the full list of commands available in Warp. ## Gathering Warp logs Retrieve Warp's logs by following the instructions for your platform below. Locate the log file and attach it to your GitHub issue or email. :::note Warp's logs and crash reports _**do not**_ contain any console input or output. See more on how we handle [Crash Reports and Telemetry](/support-and-community/privacy-and-security/privacy/#what-telemetry-data-does-warp-collect-and-why). ::: <Tabs> <TabItem label="macOS"> The Warp log files are located at `~/Library/Logs/`. **Warp logs on macOS** Run the following to zip the Warp logs to your Desktop: ```bash zip -j ~/Desktop/warp-logs.zip ~/Library/Logs/warp.log* ``` **Warp Preview logs on macOS** Run the following to zip the Warp Preview logs to your Desktop: ```bash zip -j ~/Desktop/warp_preview-logs.zip ~/Library/Logs/warp_preview.log* ``` :::caution If your issue is graphical (e.g. no display of windows) or a crash, please run Warp with the following command to capture more log information: ```bash # Run if Warp on macOS is installed RUST_LOG=wgpu_core=info,wgpu_hal=info /Applications/Warp.app/Contents/MacOS/stable # Run if Warp Preview on macOS is installed RUST_LOG=wgpu_core=info,wgpu_hal=info /Applications/WarpPreview.app/Contents/MacOS/preview ``` ::: </TabItem> <TabItem label="Windows"> The Warp log files are located at `$env:LOCALAPPDATA\warp\Warp\data\logs\`. **Warp logs on Windows** Close Warp and run the following from another terminal to zip the logs to your Desktop: ```powershell Compress-Archive -Path "$env:LOCALAPPDATA\warp\Warp\data\logs\warp.log*" -DestinationPath "$([Environment]::GetFolderPath('Desktop'))\warp-logs.zip" ``` **Warp Preview logs on Windows** Close Warp Preview and run the following from another terminal to zip the logs to your Desktop: ```powershell Compress-Archive -Path "$env:LOCALAPPDATA\warp\WarpPreview\data\logs\warp_preview.log*" -DestinationPath "$([Environment]::GetFolderPath('Desktop'))\warp_preview-logs.zip" ``` :::caution If your issue is graphical (e.g. no display of windows) or a crash, please run Warp with the following command to capture more log information: ```powershell # Run if Warp on Windows is installed for a single user $env:RUST_LOG="wgpu_core=info,wgpu_hal=info"; & "$env:LOCALAPPDATA\Programs\Warp\warp.exe" # Run if Warp on Windows is installed for all users $env:RUST_LOG="wgpu_core=info,wgpu_hal=info"; & "$env:PROGRAMFILES\Warp\warp.exe" # Run if Warp Preview on Windows is installed for a single user $env:RUST_LOG="wgpu_core=info,wgpu_hal=info"; & "$env:LOCALAPPDATA\Programs\WarpPreview\preview.exe" # Run if Warp Preview on Windows is installed for all users $env:RUST_LOG="wgpu_core=info,wgpu_hal=info"; & "$env:PROGRAMFILES\WarpPreview\preview.exe" ``` ::: </TabItem> <TabItem label="Linux"> The Warp log files are located at `~/.local/state/warp-terminal/`. **Warp logs on Linux** Run the following to zip the Warp logs to your home directory: ```bash (cd ~/.local/state/warp-terminal && tar -czf ~/warp-logs.tar.gz warp.log*) ``` **Warp Preview logs on Linux** Run the following to zip the Warp Preview logs to your home directory: ```bash (cd ~/.local/state/warp-terminal-preview && tar -czf ~/warp_preview-logs.tar.gz warp_preview.log*) ``` :::caution If your issue is graphical (e.g. no display of windows) or a crash, please run Warp with the following command to capture more log information: ```bash # Run if Warp on Linux is installed RUST_LOG=wgpu_core=info,wgpu_hal=info MESA_DEBUG=1 EGL_LOG_LEVEL=debug warp-terminal # Run if Warp Preview on Linux is installed RUST_LOG=wgpu_core=info,wgpu_hal=info MESA_DEBUG=1 EGL_LOG_LEVEL=debug warp-terminal-preview ``` ::: </TabItem> </Tabs> ## Collecting crash reports on macOS If Warp crashes, macOS may generate `.ips` crash report files in `~/Library/Logs/DiagnosticReports/`. Run the following to collect all Warp crash reports into a zip on your Desktop: ```bash files=$(find ~/Library/Logs/DiagnosticReports -name "*.ips" -exec grep -l "dev\.warp" {} + 2>/dev/null) && [ -n "$files" ] && echo "$files" | xargs zip -j ~/Desktop/warp-crash-logs.zip || echo "No Warp crash reports found." ``` Attach the resulting `warp-crash-logs.zip` to your [bug report](/support-and-community/troubleshooting-and-support/sending-us-feedback/#sending-warp-feedback). :::note This command searches crash report files for Warp's bundle identifier, so it works across all Warp channels (Stable, Preview). ::: ## Collecting debug info on Windows Occasionally, the Warp team may ask you to provide debugging information on Windows OS in particular with one of the following: ```powershell # If Warp is in your PATH, Run: warp --dump-debug-info # Otherwise you may need to use an absolute path and ... # Warp on Windows is installed for a single user, Run: & $env:LOCALAPPDATA\programs\Warp\warp.exe --dump-debug-info # Warp on Windows is installed for all users, Run: & $env:PROGRAMFILES\Warp\warp.exe --dump-debug-info ``` ## Collecting CPU samples Certain conditions can cause Warp to use more CPU than expected or become unresponsive. Collecting a CPU sample while the issue is happening is the best way to report it. The sample provides the information the Warp team needs to identify and fix the root cause. Collect a sample using the steps for your platform and attach it to a new [GitHub issue](https://github.com/warpdotdev/warp/issues/new/choose). <Tabs> <TabItem label="macOS"> 1. Reproduce the high CPU usage or unresponsiveness in Warp. 2. While the issue is occurring, open **Activity Monitor**, select the **Warp** process, and click **Sample Process**. <figure>  <figcaption>Sampling a Warp process in Activity Monitor.</figcaption> </figure> 3. Save the resulting sample and attach it to your GitHub issue. </TabItem> <TabItem label="Windows"> Install [`samply`](https://github.com/mstange/samply) to record a CPU trace: ```powershell powershell -ExecutionPolicy Bypass -c "irm https://github.com/mstange/samply/releases/download/samply-v0.13.1/samply-installer.ps1 | iex" ``` 1. Find the Warp process ID: ```powershell Get-Process *warp* ``` 2. Start recording, replacing `<PID>` with the process ID from the previous step: ```powershell samply record -p <PID> ``` 3. Reproduce the issue that causes high CPU usage or unresponsiveness. 4. Press `Ctrl+C` to stop recording. `samply` opens the profile in the Firefox Profiler in your browser. Click the upload icon in the top-right corner to generate a shareable link, then paste it into your GitHub issue. </TabItem> <TabItem label="Linux"> Install [`samply`](https://github.com/mstange/samply) to record a CPU trace: ```bash curl --proto '=https' --tlsv1.2 -LsSf https://github.com/mstange/samply/releases/download/samply-v0.13.1/samply-installer.sh | sh ``` :::caution `samply` requires access to Linux perf events. If you get a permission error, run: ```bash echo '-1' | sudo tee /proc/sys/kernel/perf_event_paranoid ``` ::: 1. Start recording the Warp process: ```bash samply record -p $(pgrep -f warp-terminal) ``` 2. Reproduce the issue that causes high CPU usage or unresponsiveness. 3. Press `Ctrl+C` to stop recording. `samply` opens the profile in the Firefox Profiler in your browser. Click the upload icon in the top-right corner to generate a shareable link, then paste it into your GitHub issue. :::note If you prefer not to install `samply`, you can use the built-in `perf` tool instead: ```bash perf record -g -p $(pgrep -f warp-terminal) -- sleep 30 ``` Attach the resulting `perf.data` file from your current directory to your GitHub issue. ::: </TabItem> </Tabs> ## Gathering AI conversation ID To gather the conversation ID, `RIGHT-CLICK` on the AI conversation block in question and select "Copy conversation ID", then paste that into the [bug report](/support-and-community/troubleshooting-and-support/sending-us-feedback/#sending-warp-feedback) that you submit so that our team can investigate the issue. Whenever there is an error in the Agent Conversation, there will also be an option to directly copy the conversation ID for the bug report. Walk me through resolving this issue: https://docs.warp.dev/support-and-community/troubleshooting-and-support/sending-us-feedback/Send Warp feedback, bug reports, and feature requests, and gather logs, crash reports, CPU samples, and AI conversation IDs to attach to them.
Sending Warp feedback
Section titled “Sending Warp feedback”- Use the
/feedbackslash command inside Warp to open the static feedback experience. - Open a new bug or feature request in our GitHub repository.
- Join our Warp Community Slack and share feedback in #feedback-general, or #feedback-preview if it is specific to Warp Preview.
- For security issues or questions, email security@warp.dev.
- For questions about privacy, email privacy@warp.dev.
Subscribers and Enterprise
Section titled “Subscribers and Enterprise”- For subscriber technical issues or questions (bugs, credits, etc.), email support@warp.dev.
- For subscriber billing issues or questions (refunds, cancellation, etc.), email billing@warp.dev.
- For enterprise, please direct all feedback and issues to your designated Slack channel.
Using /feedback in Warp
Section titled “Using /feedback in Warp”The /feedback slash command is the fastest way to report a Warp bug, flag a regression, or file a feature request from inside the terminal. It opens the feedback form without starting an Agent conversation or consuming credits.
What to include
Section titled “What to include”Whether you use the /feedback slash command or file an issue manually, a good feedback report answers these questions up front:
- What happened? Describe the observed behavior in one or two sentences.
- What did you expect? Describe the behavior you expected instead.
- How do we reproduce it? List numbered steps when possible. If you can’t reproduce the issue reliably, mention that too.
- What version of Warp are you on?
/feedbackfills this in automatically; for manual reports, copy it from Settings > Account. - Logs, screenshots, or conversation IDs. See Gathering Warp logs, Collecting crash reports on macOS, or Gathering AI conversation ID below.
See the Slash Commands reference for the full list of commands available in Warp.
Gathering Warp logs
Section titled “Gathering Warp logs”Retrieve Warp’s logs by following the instructions for your platform below. Locate the log file and attach it to your GitHub issue or email.
The Warp log files are located at ~/Library/Logs/.
Warp logs on macOS
Run the following to zip the Warp logs to your Desktop:
zip -j ~/Desktop/warp-logs.zip ~/Library/Logs/warp.log*Warp Preview logs on macOS
Run the following to zip the Warp Preview logs to your Desktop:
zip -j ~/Desktop/warp_preview-logs.zip ~/Library/Logs/warp_preview.log*The Warp log files are located at $env:LOCALAPPDATA\warp\Warp\data\logs\.
Warp logs on Windows
Close Warp and run the following from another terminal to zip the logs to your Desktop:
Compress-Archive -Path "$env:LOCALAPPDATA\warp\Warp\data\logs\warp.log*" -DestinationPath "$([Environment]::GetFolderPath('Desktop'))\warp-logs.zip"Warp Preview logs on Windows
Close Warp Preview and run the following from another terminal to zip the logs to your Desktop:
Compress-Archive -Path "$env:LOCALAPPDATA\warp\WarpPreview\data\logs\warp_preview.log*" -DestinationPath "$([Environment]::GetFolderPath('Desktop'))\warp_preview-logs.zip"The Warp log files are located at ~/.local/state/warp-terminal/.
Warp logs on Linux
Run the following to zip the Warp logs to your home directory:
(cd ~/.local/state/warp-terminal && tar -czf ~/warp-logs.tar.gz warp.log*)Warp Preview logs on Linux
Run the following to zip the Warp Preview logs to your home directory:
(cd ~/.local/state/warp-terminal-preview && tar -czf ~/warp_preview-logs.tar.gz warp_preview.log*)Collecting crash reports on macOS
Section titled “Collecting crash reports on macOS”If Warp crashes, macOS may generate .ips crash report files in ~/Library/Logs/DiagnosticReports/. Run the following to collect all Warp crash reports into a zip on your Desktop:
files=$(find ~/Library/Logs/DiagnosticReports -name "*.ips" -exec grep -l "dev\.warp" {} + 2>/dev/null) && [ -n "$files" ] && echo "$files" | xargs zip -j ~/Desktop/warp-crash-logs.zip || echo "No Warp crash reports found."Attach the resulting warp-crash-logs.zip to your bug report.
Collecting debug info on Windows
Section titled “Collecting debug info on Windows”Occasionally, the Warp team may ask you to provide debugging information on Windows OS in particular with one of the following:
# If Warp is in your PATH, Run:warp --dump-debug-info
# Otherwise you may need to use an absolute path and ...# Warp on Windows is installed for a single user, Run:& $env:LOCALAPPDATA\programs\Warp\warp.exe --dump-debug-info
# Warp on Windows is installed for all users, Run:& $env:PROGRAMFILES\Warp\warp.exe --dump-debug-info
Collecting CPU samples
Section titled “Collecting CPU samples”Certain conditions can cause Warp to use more CPU than expected or become unresponsive. Collecting a CPU sample while the issue is happening is the best way to report it. The sample provides the information the Warp team needs to identify and fix the root cause.
Collect a sample using the steps for your platform and attach it to a new GitHub issue.
- Reproduce the high CPU usage or unresponsiveness in Warp.
- While the issue is occurring, open Activity Monitor, select the Warp process, and click Sample Process.
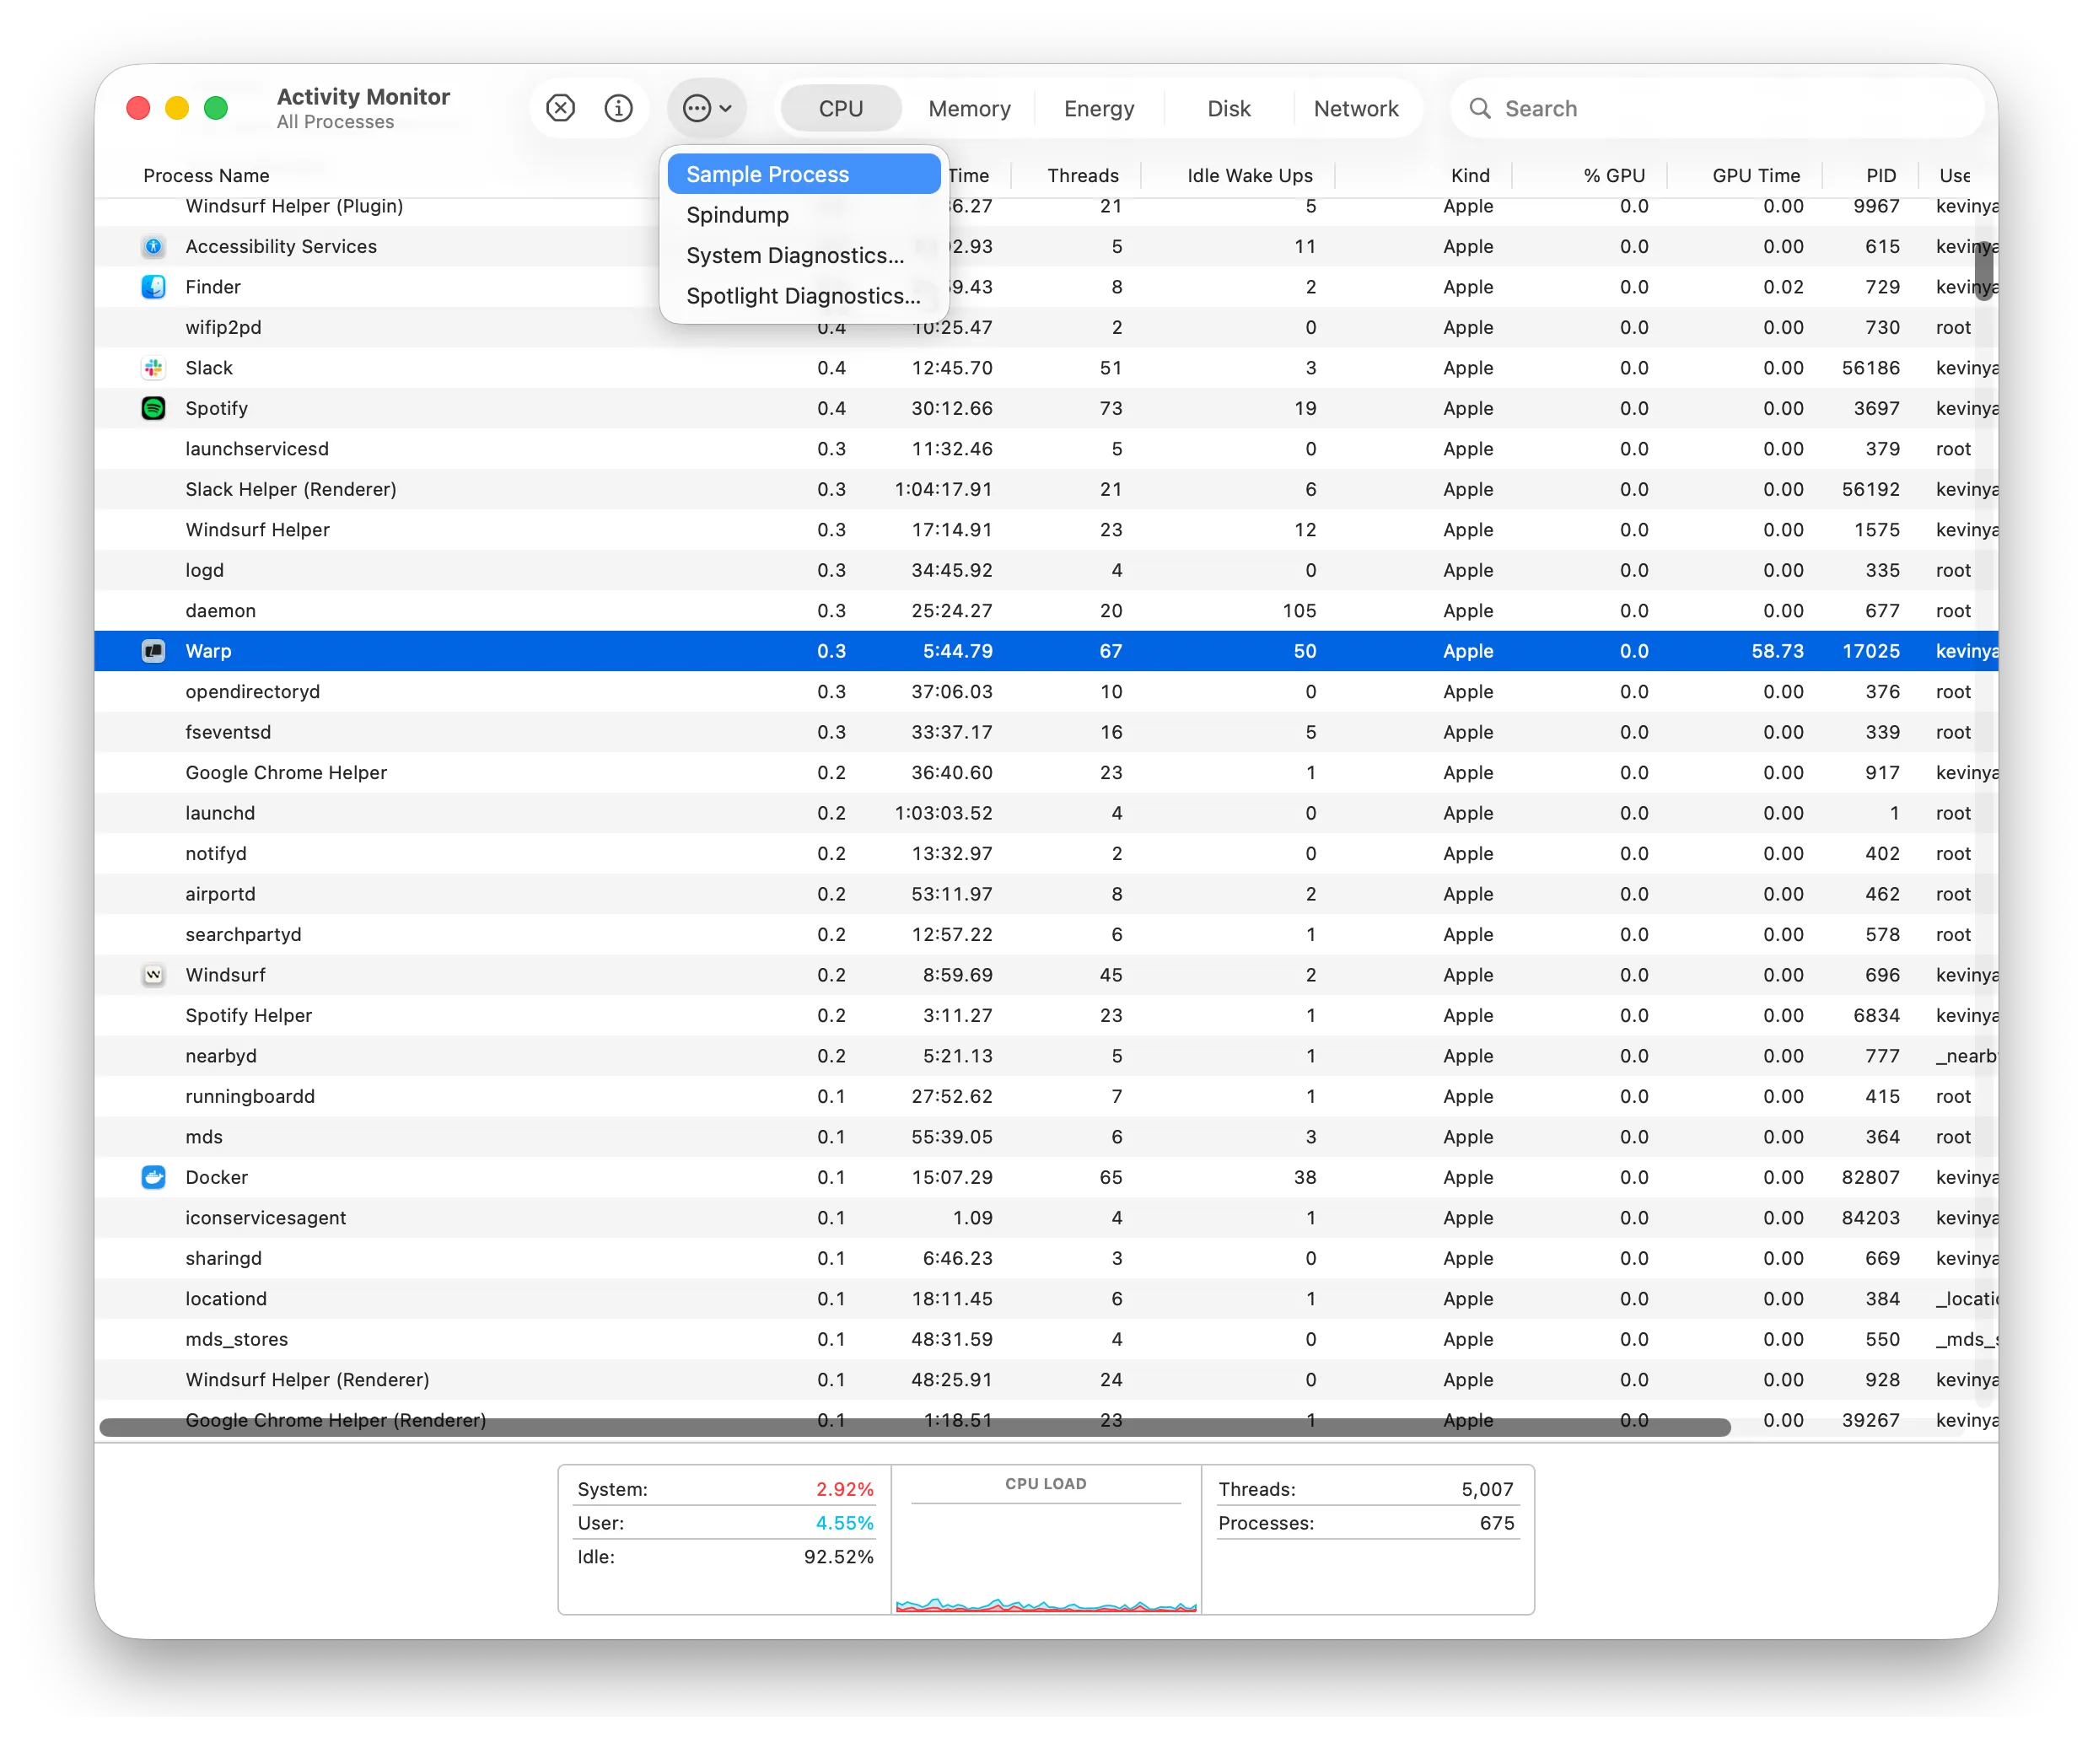
- Save the resulting sample and attach it to your GitHub issue.
Install samply to record a CPU trace:
powershell -ExecutionPolicy Bypass -c "irm https://github.com/mstange/samply/releases/download/samply-v0.13.1/samply-installer.ps1 | iex"-
Find the Warp process ID:
Terminal window Get-Process *warp* -
Start recording, replacing
<PID>with the process ID from the previous step:Terminal window samply record -p <PID> -
Reproduce the issue that causes high CPU usage or unresponsiveness.
-
Press
Ctrl+Cto stop recording.samplyopens the profile in the Firefox Profiler in your browser. Click the upload icon in the top-right corner to generate a shareable link, then paste it into your GitHub issue.
Install samply to record a CPU trace:
curl --proto '=https' --tlsv1.2 -LsSf https://github.com/mstange/samply/releases/download/samply-v0.13.1/samply-installer.sh | sh-
Start recording the Warp process:
Terminal window samply record -p $(pgrep -f warp-terminal) -
Reproduce the issue that causes high CPU usage or unresponsiveness.
-
Press
Ctrl+Cto stop recording.samplyopens the profile in the Firefox Profiler in your browser. Click the upload icon in the top-right corner to generate a shareable link, then paste it into your GitHub issue.
Gathering AI conversation ID
Section titled “Gathering AI conversation ID”To gather the conversation ID, RIGHT-CLICK on the AI conversation block in question and select “Copy conversation ID”, then paste that into the bug report that you submit so that our team can investigate the issue.
Whenever there is an error in the Agent Conversation, there will also be an option to directly copy the conversation ID for the bug report.
