Automation Platform > Environments
Configuring cloud agent environments
# Configuring cloud agent environments Create an environment before you run a cloud agent that needs your repositories, toolchain, or setup commands. You can create and manage environments in the Oz web app, with guided setup in Warp, or through the Oz CLI. ## Prerequisites * **GitHub repositories** - Add one or more repositories for the agent to clone and work in. * **GitHub authorization** - Authorize GitHub so the agent can access your repositories. For automated workflows that use an agent API key, configure [team GitHub authorization](/platform/team-access-billing-and-identity/#team-github-authorization) in the Admin Panel. * **Docker image** - Use a publicly accessible image that can build and run your code. Official [node](https://hub.docker.com/_/node), [python](https://hub.docker.com/_/python), and [rust](https://hub.docker.com/_/rust) images work for many projects. You can also use [Warp's prebuilt dev images](https://github.com/warpdotdev/oz-dev-environments). :::caution Musl-based Docker images, including Alpine Linux, are not supported. The agent runtime requires glibc. Use Debian, Ubuntu, or a default non-Alpine image from Docker Hub. ::: ## Create an environment in the web app <figure style={{ maxWidth: "563px" }}>  <figcaption>The Create environment panel in the Oz web app.</figcaption> </figure> 1. Open the <a href={`https://oz.warp.dev/environments`}>Environments page in the Oz web app</a>, then click **New environment**. 2. Enter a name, select one or more repositories, and enter a **Docker image reference**. Click **Suggest** to get an image recommendation based on the selected repositories. 3. Add setup commands, cloud provider access for AWS or GCP, or a description when needed. 4. Click **Create environment**. You can now use the environment with cloud agents and integrations. ## Create an environment with guided setup Run [`/create-environment`](warp://action/create_environment) in Warp to inspect your repositories and generate an environment configuration. The guided setup detects languages, frameworks, and tools, then recommends an image and setup commands. Run the command from a Git repository with no argument, or pass one or more repository paths or URLs. ```text # Local paths /create-environment ./warp-internal ./warp-server # GitHub repositories /create-environment warpdotdev/warp-internal warpdotdev/warp-server # GitHub URL /create-environment https://github.com/warpdotdev/warp-internal.git ``` Guided setup does the following: * **Detect repositories** - Identifies the languages, frameworks, and tools the agent will use. * **Recommend an image** - Finds an existing Dockerfile, recommends an official base image, or helps you build a custom image. * **Suggest setup commands** - Uses your scripts and package managers to recommend workspace setup. * **Create the environment** - Creates the environment through the CLI and returns an environment ID. ## Create an environment with the CLI Use the Oz CLI when you know the environment configuration, need a custom Docker image, or want to automate environment creation. ```bash oz environment create \ --name ENVIRONMENT_NAME \ --docker-image IMAGE_REFERENCE \ --repo OWNER/REPO \ --setup-command "SETUP_COMMAND" \ --description "DESCRIPTION" ``` Replace `ENVIRONMENT_NAME` with a human-readable label, `IMAGE_REFERENCE` with a Docker Hub image, `OWNER/REPO` with a repository to clone, `SETUP_COMMAND` with a workspace command, and `DESCRIPTION` with an optional summary. Repeat `--repo` and `--setup-command` for each additional repository or command. ## Environment design and best practices Design the image and setup commands so they produce the same workspace on every run. * **Keep setup repeatable** - Write setup commands that are safe to rerun and produce the same toolchain and workspace state for a given repository revision. * **Pin toolchain versions** - Pin language runtimes and core tools in a Docker image, then use lockfiles such as `package-lock.json` for dependencies. * **Define the workspace boundary** - In a multi-repo environment, state which repositories are cloned and where setup commands run. * **Make prerequisites explicit** - Add any required build, code generation, or system-package installation steps to the setup commands. ```bash # Repeatable setup mkdir -p .cache npm ci # Setup that can fail on rerun or drift over time mkdir .cache npm install ``` If setup commands need credentials, configure [Agent Secrets](/platform/secrets/) instead of hardcoding tokens. ## Configure container users Cloud agents run as a non-root user inside the container. Configure your image and setup commands for that user before you create the environment. ### Understand how Warp chooses the container user * **Image with a non-root `USER`** - Warp respects the Dockerfile `USER` directive and runs the agent as that user. * **Image that starts as root** - Warp runs the agent as a dedicated `agent` user with passwordless `sudo`. The user has UID and GID 1000 when available. * **Image that cannot support a non-root user** - If Warp can't install `sudo` or the workspace isn't writable by the agent user, it logs a warning and continues as root. ### Prepare images and setup commands * **Use `sudo` for root access** - Prefix commands such as `apt-get install`, writes to `/usr/local` or `/etc`, and `chown` with `sudo`. Passwordless `sudo` preserves your `PATH`, but removes unsafe variables such as `LD_*` and `BASH_ENV`. * **Install tools outside `/root`** - The agent home directory is `/home/agent`. Install tools and configuration stored in `~/.bashrc`, `~/.cargo`, or `~/.nvm` system-wide or somewhere the `agent` user can access. * **Keep directories writable by UID and GID 1000** - Files the agent creates use UID 1000. Directories in your image must be writable by that user. :::note To temporarily restore root behavior while you update an image or setup commands, set `WARP_AGENT_NONROOT=0` in the image, such as with a Dockerfile `ENV` directive. ::: ## Manage environments Use the Oz CLI to inspect and update environments after you create them. ### List environments ```bash oz environment list ``` ### View an environment Replace `<ENV_ID>` with the ID of the environment you want to view. ```bash oz environment get <ENV_ID> ``` ### Update an environment Replace `<ENV_ID>` with the ID of the environment you want to modify. ```bash # Add or remove a repository oz environment update <ENV_ID> --repo OWNER/REPO oz environment update <ENV_ID> --remove-repo OWNER/REPO # Add or remove a setup command oz environment update <ENV_ID> --setup-command "SETUP_COMMAND" oz environment update <ENV_ID> --remove-setup-command "SETUP_COMMAND" # Update the name, description, or Docker image oz environment update <ENV_ID> --name "ENVIRONMENT_NAME" oz environment update <ENV_ID> --description "DESCRIPTION" oz environment update <ENV_ID> --docker-image IMAGE_REFERENCE ``` Use `--remove-description` to clear the description. Use `--force` to skip confirmation checks for environments used by integrations. ### Delete an environment Replace `<ENV_ID>` with the ID of the environment you want to delete. ```bash oz environment delete <ENV_ID> ``` Add `--force` to skip confirmation checks for environments used by integrations. ## Related pages * [Cloud agent environments](/platform/environments/) for the conceptual overview. * [Troubleshooting cloud agent environments](troubleshooting-environments/) to resolve setup and runtime problems. * [Integration setup](/agents/cli/oz-cli/integration-setup/) to configure end-to-end integration workflows.Tell me about this feature: https://docs.warp.dev/platform/environments/configuring-environments/Create, configure, and manage cloud agent environments with the Oz web app, guided setup in Warp, or the Oz CLI.
Create an environment before you run a cloud agent that needs your repositories, toolchain, or setup commands. You can create and manage environments in the Oz web app, with guided setup in Warp, or through the Oz CLI.
Prerequisites
Section titled “Prerequisites”- GitHub repositories - Add one or more repositories for the agent to clone and work in.
- GitHub authorization - Authorize GitHub so the agent can access your repositories. For automated workflows that use an agent API key, configure team GitHub authorization in the Admin Panel.
- Docker image - Use a publicly accessible image that can build and run your code. Official node, python, and rust images work for many projects. You can also use Warp’s prebuilt dev images.
Create an environment in the web app
Section titled “Create an environment in the web app”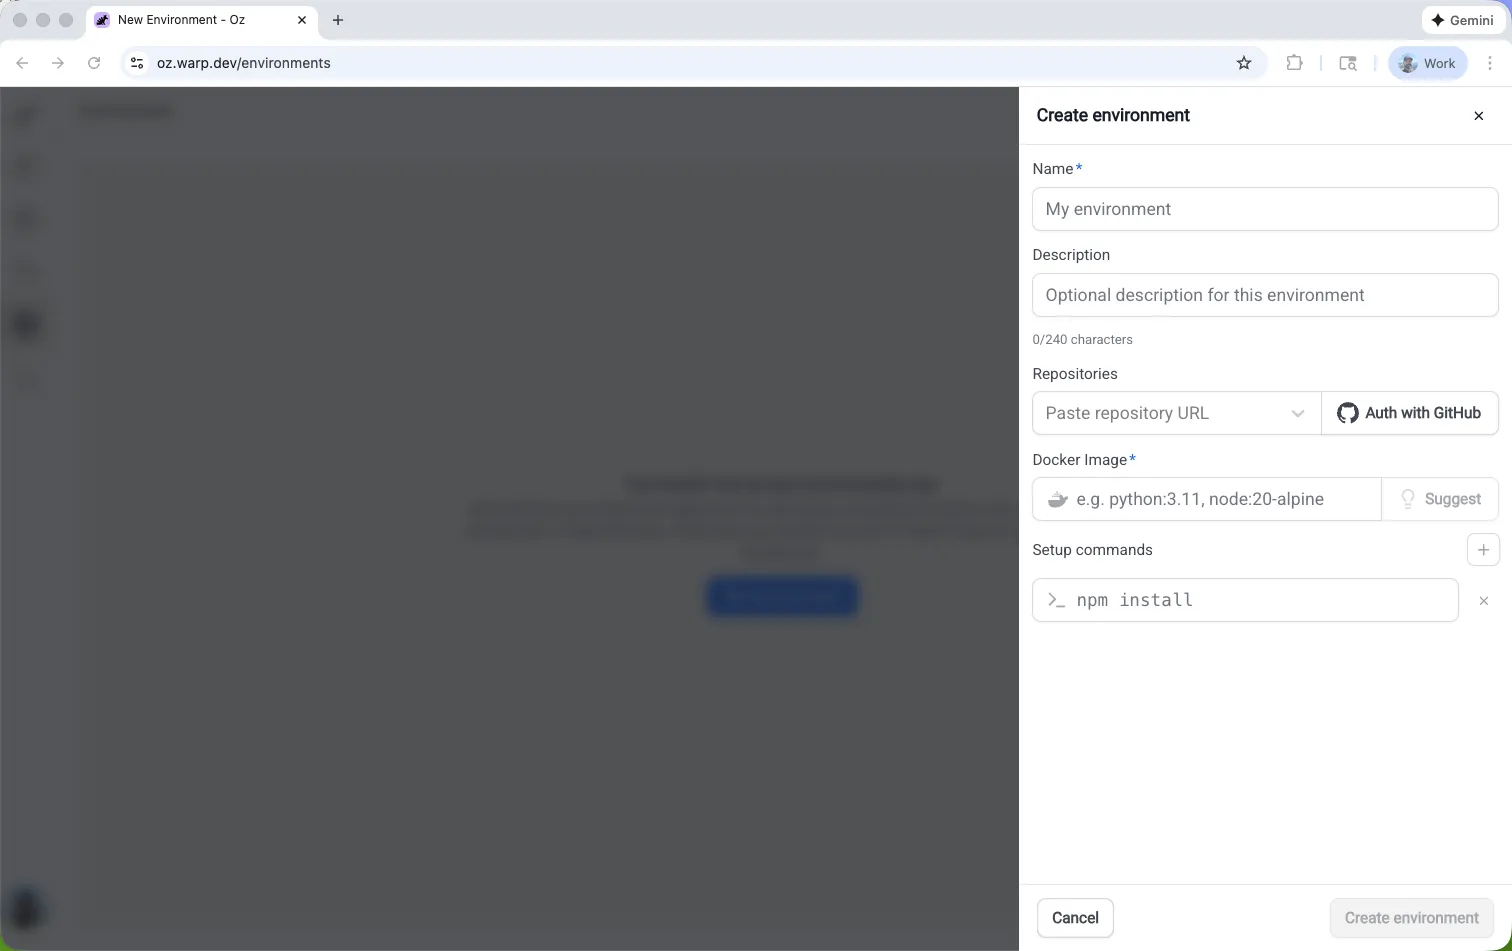
- Open the Environments page in the Oz web app, then click New environment.
- Enter a name, select one or more repositories, and enter a Docker image reference. Click Suggest to get an image recommendation based on the selected repositories.
- Add setup commands, cloud provider access for AWS or GCP, or a description when needed.
- Click Create environment. You can now use the environment with cloud agents and integrations.
Create an environment with guided setup
Section titled “Create an environment with guided setup”Run /create-environment in Warp to inspect your repositories and generate an environment configuration. The guided setup detects languages, frameworks, and tools, then recommends an image and setup commands.
Run the command from a Git repository with no argument, or pass one or more repository paths or URLs.
# Local paths/create-environment ./warp-internal ./warp-server
# GitHub repositories/create-environment warpdotdev/warp-internal warpdotdev/warp-server
# GitHub URL/create-environment https://github.com/warpdotdev/warp-internal.git
Guided setup does the following:
- Detect repositories - Identifies the languages, frameworks, and tools the agent will use.
- Recommend an image - Finds an existing Dockerfile, recommends an official base image, or helps you build a custom image.
- Suggest setup commands - Uses your scripts and package managers to recommend workspace setup.
- Create the environment - Creates the environment through the CLI and returns an environment ID.
Create an environment with the CLI
Section titled “Create an environment with the CLI”Use the Oz CLI when you know the environment configuration, need a custom Docker image, or want to automate environment creation.
oz environment create \ --name ENVIRONMENT_NAME \ --docker-image IMAGE_REFERENCE \ --repo OWNER/REPO \ --setup-command "SETUP_COMMAND" \ --description "DESCRIPTION"Replace ENVIRONMENT_NAME with a human-readable label, IMAGE_REFERENCE with a Docker Hub image, OWNER/REPO with a repository to clone, SETUP_COMMAND with a workspace command, and DESCRIPTION with an optional summary. Repeat --repo and --setup-command for each additional repository or command.
Environment design and best practices
Section titled “Environment design and best practices”Design the image and setup commands so they produce the same workspace on every run.
- Keep setup repeatable - Write setup commands that are safe to rerun and produce the same toolchain and workspace state for a given repository revision.
- Pin toolchain versions - Pin language runtimes and core tools in a Docker image, then use lockfiles such as
package-lock.jsonfor dependencies. - Define the workspace boundary - In a multi-repo environment, state which repositories are cloned and where setup commands run.
- Make prerequisites explicit - Add any required build, code generation, or system-package installation steps to the setup commands.
# Repeatable setupmkdir -p .cachenpm ci
# Setup that can fail on rerun or drift over timemkdir .cachenpm install
If setup commands need credentials, configure Agent Secrets instead of hardcoding tokens.
Configure container users
Section titled “Configure container users”Cloud agents run as a non-root user inside the container. Configure your image and setup commands for that user before you create the environment.
Understand how Warp chooses the container user
Section titled “Understand how Warp chooses the container user”- Image with a non-root
USER- Warp respects the DockerfileUSERdirective and runs the agent as that user. - Image that starts as root - Warp runs the agent as a dedicated
agentuser with passwordlesssudo. The user has UID and GID 1000 when available. - Image that cannot support a non-root user - If Warp can’t install
sudoor the workspace isn’t writable by the agent user, it logs a warning and continues as root.
Prepare images and setup commands
Section titled “Prepare images and setup commands”- Use
sudofor root access - Prefix commands such asapt-get install, writes to/usr/localor/etc, andchownwithsudo. Passwordlesssudopreserves yourPATH, but removes unsafe variables such asLD_*andBASH_ENV. - Install tools outside
/root- The agent home directory is/home/agent. Install tools and configuration stored in~/.bashrc,~/.cargo, or~/.nvmsystem-wide or somewhere theagentuser can access. - Keep directories writable by UID and GID 1000 - Files the agent creates use UID 1000. Directories in your image must be writable by that user.
Manage environments
Section titled “Manage environments”Use the Oz CLI to inspect and update environments after you create them.
List environments
Section titled “List environments”oz environment listView an environment
Section titled “View an environment”Replace <ENV_ID> with the ID of the environment you want to view.
oz environment get <ENV_ID>Update an environment
Section titled “Update an environment”Replace <ENV_ID> with the ID of the environment you want to modify.
# Add or remove a repositoryoz environment update <ENV_ID> --repo OWNER/REPOoz environment update <ENV_ID> --remove-repo OWNER/REPO
# Add or remove a setup commandoz environment update <ENV_ID> --setup-command "SETUP_COMMAND"oz environment update <ENV_ID> --remove-setup-command "SETUP_COMMAND"
# Update the name, description, or Docker imageoz environment update <ENV_ID> --name "ENVIRONMENT_NAME"oz environment update <ENV_ID> --description "DESCRIPTION"oz environment update <ENV_ID> --docker-image IMAGE_REFERENCE
Use --remove-description to clear the description. Use --force to skip confirmation checks for environments used by integrations.
Delete an environment
Section titled “Delete an environment”Replace <ENV_ID> with the ID of the environment you want to delete.
oz environment delete <ENV_ID>Add --force to skip confirmation checks for environments used by integrations.
Related pages
Section titled “Related pages”- Cloud agent environments for the conceptual overview.
- Troubleshooting cloud agent environments to resolve setup and runtime problems.
- Integration setup to configure end-to-end integration workflows.